Category Archives: ব্লগার

আপনার ব্লগার ব্লগের জন্য নিন একটি দারুন বাংলা Facebook Like বক্স ।


আল্লাহ্‌ এর  নাম নিয়ে আজকের এই পোস্ট শুরু করছি । আজকে আমি আপনাদেরকে  দারুন একটি বাংলা Facebook Like বক্স Widget  উপহার দেবো , আশাকরি আপনাদের খুব পছন্দ হবে এবং আপনার ব্লগকে আরও সুন্দর করে তুলবে । কিভাবে যুক্ত করবেন সব কিছু পেতে একটু কষ্ট করে নিচে যান । Read the rest of this entry

আপনার ব্লগস্পট ব্লগে যুক্ত করুন “ছবিযুক্ত thumbnail সহ রিলেটেড পোস্ট” widget


ব্লগার বা ব্লগস্পটের ব্লগে যে কোন পোস্টের শেষে আপনি সহজেই তার সাথে সম্পর্কিত অর্থাৎ একই ক্যাটাগরির পোস্টগুলোকে ছবিযুক্ত thumbnail সহ দেখাতে পারেন সহজেই। এর জন্য আপনাকে যা করতে হবে তা হল-
* LinkWithin সাইটে যান।
*সেখানে যে ফর্মটি পাবেন তা email, blog URL, Blogger, width দিয়ে পূরন করুন।এখানে width বলতে যতটি রিলেটেড পোস্ট দেখাতে চান তার সংখ্যাকে বোঝায়। আমি পাঁচটি দেখাতে চায় তাই ৫ টি সিলেক্ট করেছি :)
 
*blogger এ লগ ইন করে Get widget বাটনে ক্লিক করুন।
*এরপর যে পেজ আসবে তা থেকে install widget এ ক্লিক করুন।
*Add widge বাটনে ক্লিক করুন।

*এরপর নিচের চিত্রের মত করে তা drag করে ‘ব্লগ পোস্টস” এর নিচে নিয়ে আসুন।

*save/সংরক্ষন করুন বাটনে ক্লিক করুন।
ব্যস! খেল খতম। :)
আপনার ব্লগ চেক করে দেখুন প্রতিটা পোস্টের শেষে Related posts দেখাচ্ছে। :D

How to add flying twitter bird on your blogger


Are you want to add a cute flying twitter bird on your blog?
This post for you.

1.Log in to your dashboard–> Design- ->Page Elements.
2.Click on ‘Add a Gadget’ on the sidebar.
3.Select ‘HTML/Javascript’ and add the code given below and click save.


var twitterAccount = "YOUR TWITTER USERNAME";
var tweetThisText = "Computer & Technology";
tripleflapInit();
Flying Twitter Bird Widget By Bloggertricks


Put your twitter user name on YOUR TWITTER USERNAME.

Demo on my site.

Add Live People Traffic Widget on Blogger.


Add Live Traffic on your Blogger.

Like This Image

To add it on Left Top. Like Image ↓

Download This Code

To add it on Left Center. Like Image ↓

Download This Code.

To add it on Left Bottom. Like Image ↓

Download This Code.

To add it on Right Top. Like Image ↓

Download This Code.

To add it on Right Center. Like Image ↓

Download This Code.

To add it on Right Bottom. Like Image ↓

Download This Code.

How to add it on your blogger????

  • First Sign in on Blogger.
  • Go to Layout on Left menu.
  • Click: Add a new gadget
  • Chose HTML/JavaScript 
  • Past HTML Code What your Download (any 1 your choice)
  • Click Save button.
Thanks.

Create A Grab Our Button/Badge Widget And Add It To Blogger/Blogspot


Grab our button/badge is a most amazing way to promote your blog via other blogs,Your blog fans or users can easily add this on their blog. 


How To Create A Badge For Your Blog?

  1. Go to Cooltext (Follow the image instructions below )


2. Select PIXEL BADGE. And follow the image instructions below.


3. After you customize all windows hit RENDER LOGO button at bottom left and   
download the image.


4. Upload it and get URL of the downloaded image like .png or .jpg


Code


<a href="Enter your Site URL"><img alt="" src="Enter Your Image URL" title="
Title On Mouse Hovering" />


<input type="text" onclick="this.focus();this.select()" readonly value="<a href="Enter your Site Url"><img alt="" src="Enter Image URL" title="
Title On Mouse Hovering" /></a>" style="
width: 100%;
" />

 
Or Download Code From Here...... 
  • Replace ENTER YOUR SITE URL with your blog address.
  • Replace ENTER YOUR IMAGE URL with your uploaded badge url.
  • Replace Title On Mouse Hovering with Title which you want on mouse hovering.
  • Now go to Blogger Dashboard > Design 
  • Then select Add a Gadget > HTML/JavaScript. 
  • Copy and paste code no.1 just below that paste code no.2 and give title like Grab Our Button 
  • Now save your changes and refresh your blog to see changes.

How To Disable Copying Text From Blog And Website


How To Disable Copying Text From Blog And Website?

Today, I want my readers to know how to protect your hard work put on creating and writing new articles on your website or blog from being copied by others. Copying the text from your site and blog and posting it elsewhere is common on the Internet. There are sites which doesn’t allow us to copy the text from the web pages. The copy function is disabled in the site by the site admin in order to protect the site. We will see how to implement the same methodology for Blogger and website. This trick is valid for any sites. This trick is going to disable (Ctrl+A) function for your site.

How To Disable Copying Text From Blog And Website? 

Please bear in mind that this is no guarantee that your content will not be copied. Someone with a little bit of experience may be able to bypass this JavaScript. But at least you are not making it so easy for them.
Please find below the HTML code that you need to instert in your blogger template or website in order to disable the copy paste function.

Features:
1.) It Will Not Allow The Visitor To Highlight Your Text.
2.) It Will Also Disable (CTRL+A) Function To Highlight.
3.) When There Is No Highlighting, No One Can Copy Your Text.
4.) Easy To Install And Quick To Load.

5.) Secure Your Content From Newbies.

How To Add In Blogger???

1.) Go To Your www.blogger.com
2.) Open Your Desire Blog.
3.) Go To Layout.
4.) Just Go To Your HTML File.
5.) Now Copy The Below Code And Paste It Between .
6.) Save It, Now You Are Done.

function disableselect(e){
return false
}
function reEnable(){
return true
}
document.onselectstart=new Function ("return false")
if (window.sidebar){
document.onmousedown=disableselect
document.onclick=reEnable
}

How to Disable Right click in Blogger / Blogspot ?


Have you noticed, that some web sites do not allow their visitors using right mouse click while pointer is on the blog area. This option is useful for the site and blog owners, who want to minimize the possibilities of the content direct copying to other posts.
right click disable copy How to Disable Right click in Blogger / Blogspot ?
Right click on any internet browser is very important element and we must use it when it comes to copy or editing texts and etc. It’s very important when it comes to webmasters too. but some people may use it in a bad way, and you may want to make click right disabled on your blog. to protect you text, images links and etc.

To setup this tool in your blog Copy the Following code and paste it to your blog by adding a new page element.

Step 1 : Go to Dashboard > Layout > Add Gadget > HTML / JavaScript
Step 2
: Copy the code from this file and paste it in that blogger widget.
Step 3
: Save the html/javascript and view you blog.

When you will try to do right click, a message will tell you that “Function disabled” , and if you want to change this words” Function Disabled” Then simply find it in code and replace it.

How to Rounding the Blogger Comment Avatar Image?


Rounding the Blogger Comment Avatar

In comment someone asked me to Rounding the Avatar image in blogger comments. here is the CSS for it!
this css will reset the avatar size to normal and rounds the Image.(so don’t use the above CSS) ;)

Search for ]]> and place the below code before it!

.avatar-image-container,
.avatar-image-container img {
max-width: 50px !important;
width: 50px !important;
max-height: 50px !important;
height: 50px !important;
padding: 0 !important;
border: 0px;
-webkit-border-radius: 999px;
-moz-border-radius: 999px;
border-radius: 999px;
}


.avatar-image-container{
border:3px solid #fff !important;
-webkit-box-shadow: 0 1px 2px #BBB;
-moz-box-shadow: 0 1px 2px #BBB;
box-shadow: 0 1px 2px #BBB;
}

Note: Default size it set to 50px. if you want Change the avatar size then simply modify the above CSS.
If this post is helpful to you? then please share it! Thanks!.
Leave your comments. → :D

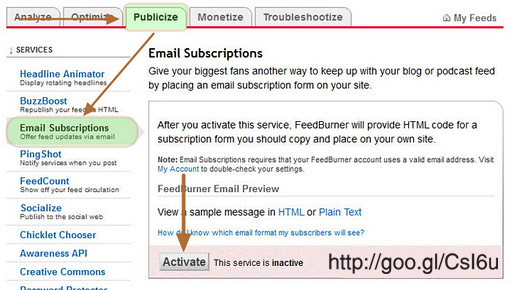
How to Add Feedburner Email Subscriptions Box to Blogger?


  1. Login to Feedburner Dashboard and Locate your Blog Feed. Click on the Feed title to get it’s Dashboard
  2. Navigate to Publicize > Email Subscripts
  3. If your Email Subscripts are not Activated, then you will see this screen. -> To activate Email Subscripts, Just click on Activate button.


  4. If your Email Subscripts are Activated, then you will see this screen.


  5. Under Subscription Management, Choose the Language, and select use widget as Blogger, finally click on Go button to add the Feedburner Email Subscriptions Box to your blog.

This is very simple tutorial, and is very useful for my up coming posts. and also, i will give you some awesome styles of email subscriptions gadgets. so stay connected with my blog. :)

আপনার ব্লগ বা ওয়েবসাইটকে বেশ কয়েকটি সাইটের সার্চ ক্যাটাগরিতে যুক্ত করুন


বন্ধুরা আপনারা সকলে কেমন আছেন । আশা করি ভাল আছেন ।
আমাদের প্রায় সকলেরই ছোট বড় ব্লগ বা ওয়েবসাইট রয়েছে । আমরা আমাদের ব্লগ বা ওয়েবসাইটকে বিস্তার করার জন্য নানা রকম কৌশল অবলম্বন করে থাকি । তার মধ্যে একটি কোশল হল সার্চ ক্যাটাগরির মাধ্যমে বিস্তার করা । সার্চ ক্যাটাগরি বলতে আপনার ব্লগ বা ওয়েবসাইট Google, Yahoo বা অনান্য বিভিন্ন সার্চিং সাইটে যুক্ত করা । সার্চিং সাইট গুলোতে আপনার ব্লগ বা ওয়েবসাইটকে যুক্ত করলে
ব্লগ বা ওয়েবসাইট সার্চ করা মাত্র তা অতি সহজেই সকলে পেয়ে যাবে ।
বন্ধুরা আজ আমি আপনাদের ব্লগ বা ওয়েবসাইটের জন্য সুন্দর একটি সাইট উপহার দেব । এই সাইটটির মাধ্যমে আপনি অতি সহজে আপনার ব্লগ বা ওয়েবসাইটকে

  • Yahoo
  • Google
  • Bing
  • Alo.
  • Lycos
  • Go
  • Web Crawler
  • Excite
  • Altavista
  • Dogpile

সাইট গুলোর সার্চ ক্যাটাগরিতে যুক্ত করতে পারবেন ।
প্রথমে এই লিংকে ক্লিক করুন। এখন সাইটটিতে ঢুকে গেলে দুটি বক্স দেখতে পাবেন । এখন প্রথম বক্সে আপনার ব্লগ বা ওয়েবসাইটের নাম বসান এবং দ্বিতীয় বক্সে আপনার ই-মেইল ID বসান এবং Submit এ ক্লিক করুন । আপনার কাজ শেষ এখন আপনার ব্লগ বা ওয়েবসাইটকে সার্চ করে দেখুন । সার্চের আগে আপনার সাইট চলে আসবে ।